Calem Blogs
How to Do Access Control by Roles (Group Design for Module Access)
Access control is by groups in Calem. A group represents a role in an organization. Access control includes: a) Modules available to a group; b) Menu available in a module; c) Form menu available; d) Fields available for editing.
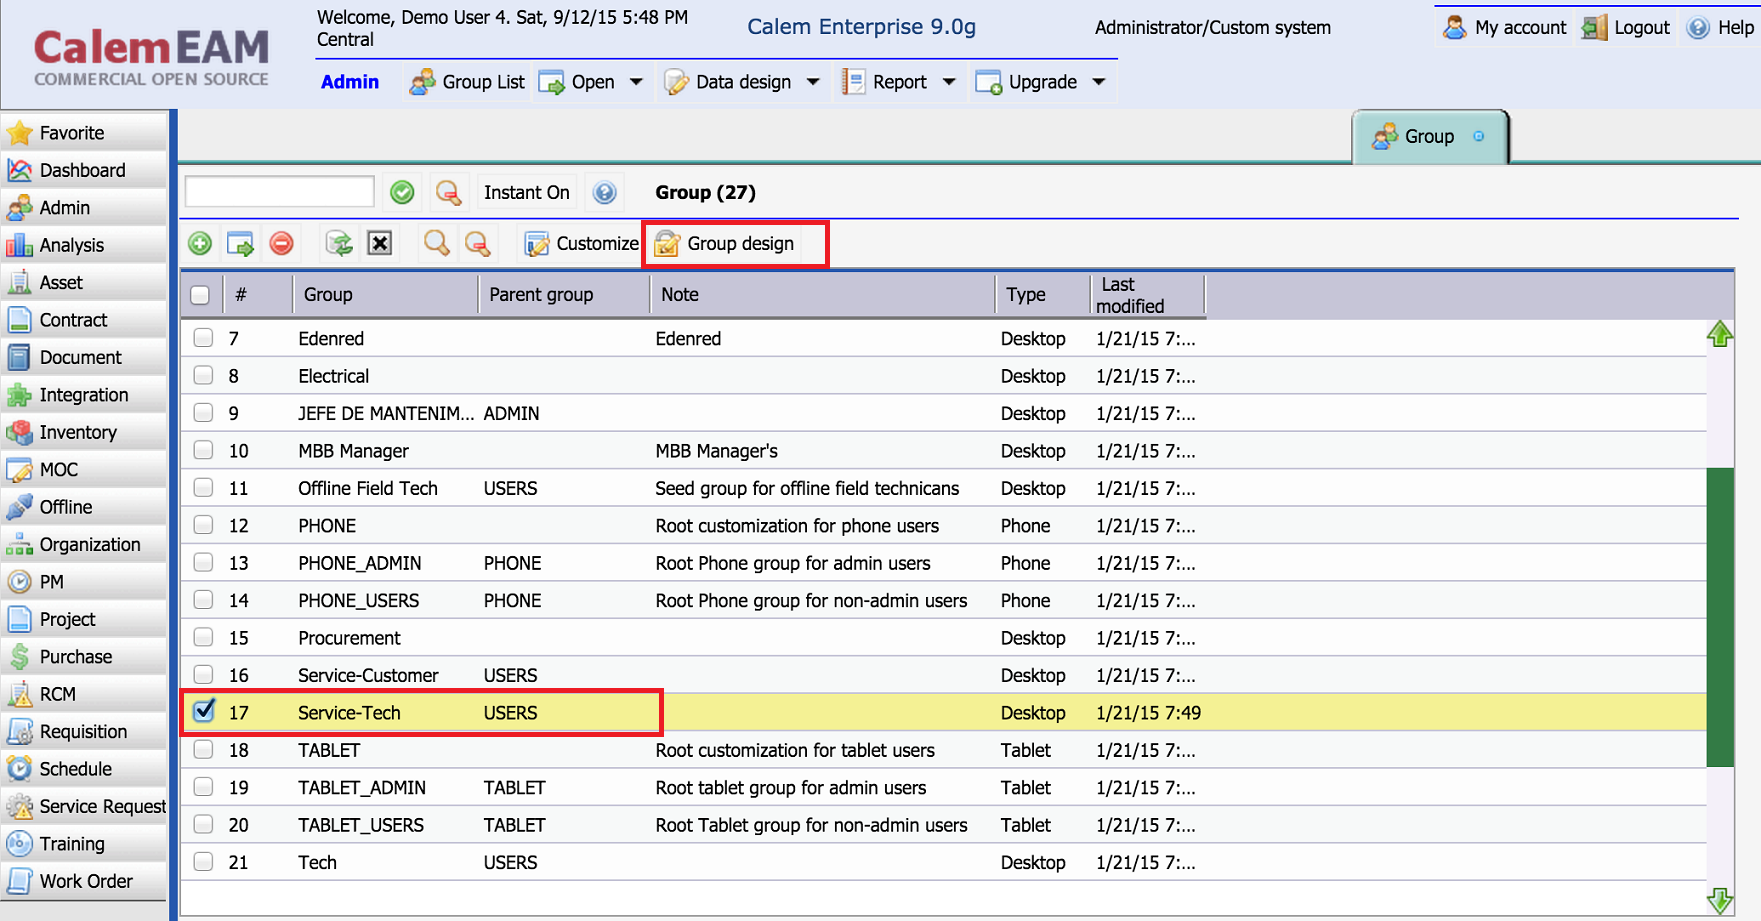
1. Pick a Group for Design
Access control is initiated in the Admin Module. Here're the steps:
- Go to "Admin" module (by clicking "Admin" from the left module bar, or top module bar).
- Go to the Group list.
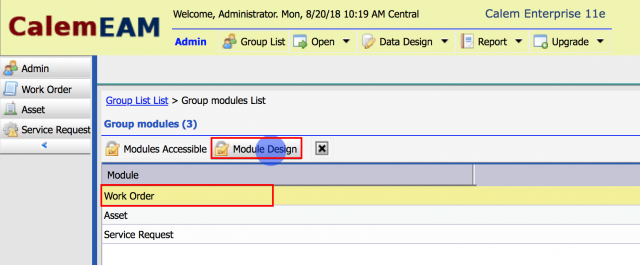
- Check the checkbox of a group for group design (for instance, "Service-Tech" in the screenshot).
- Click "Group design" menu button of the group list form to launch group design.
- Alternatively, launch group design from group tree (screenshot below).
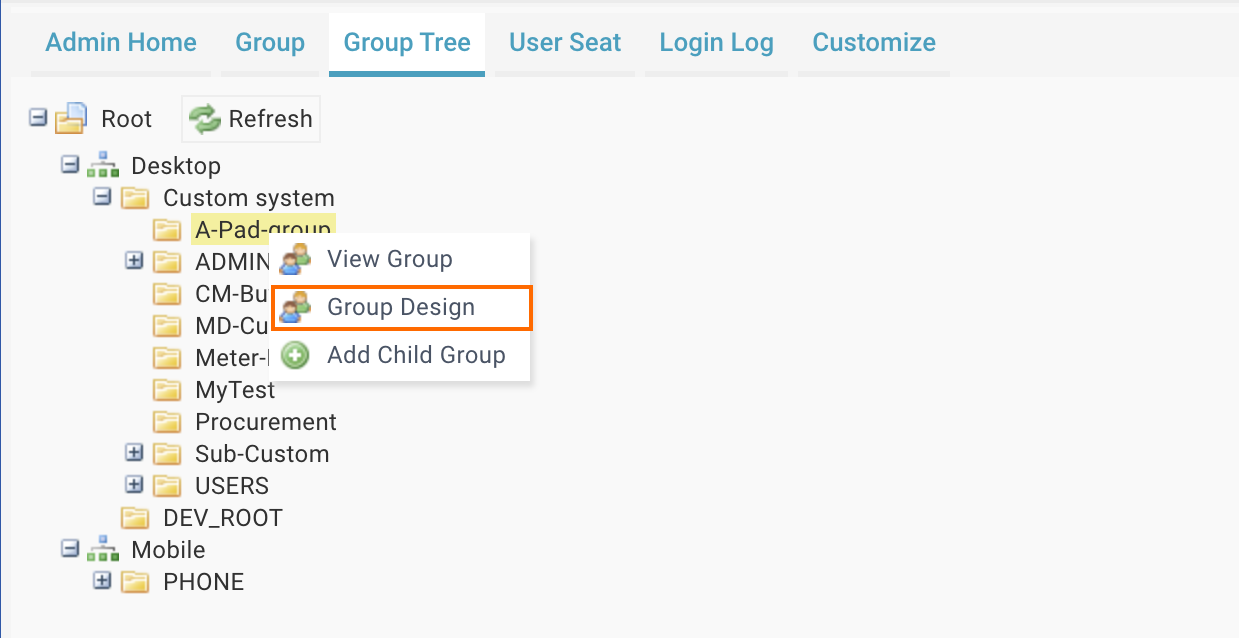
"Group design" menu launches Calem desktop into the design mode for "Service-Tech" group.
- The top band of the desktop is turned yellow.
- The left module bar is changed to show three modules granted to the "Service-Tech" group.
- All the customization will be done for the group selected while the group form is left open.
- When the group form is closed the group design mode is terminated.
1.1 Group Hierarchy
The rules to select a group to do design are:
- If you know which group to modify, select that group for "Group design".
- If not, you may select "Custom System" to change for all users.
- Calem calculates the customization based on group hierarchy starting with the group of the login profile.
- If a customization is found in the login group, the customization is used.
- If not, a parent group is searched till a customization is found.
- The root parent group is "Custom System" for web, and "Phone" for mobile.
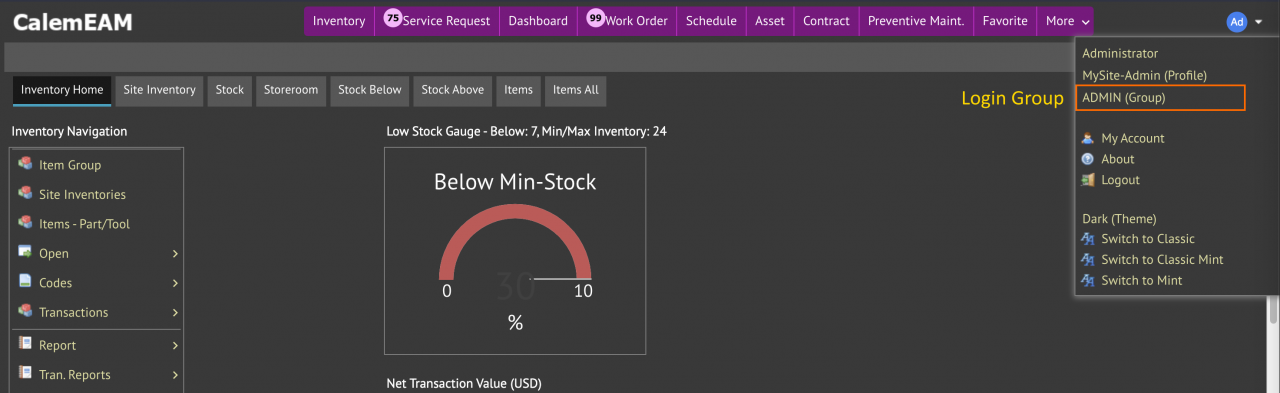
1.2 The Login Group
The login profile and group are shown from the dropdown of the login icon (top right of the screen). For instance, the login profile is "MySite Admin", the group is "ADMIN".
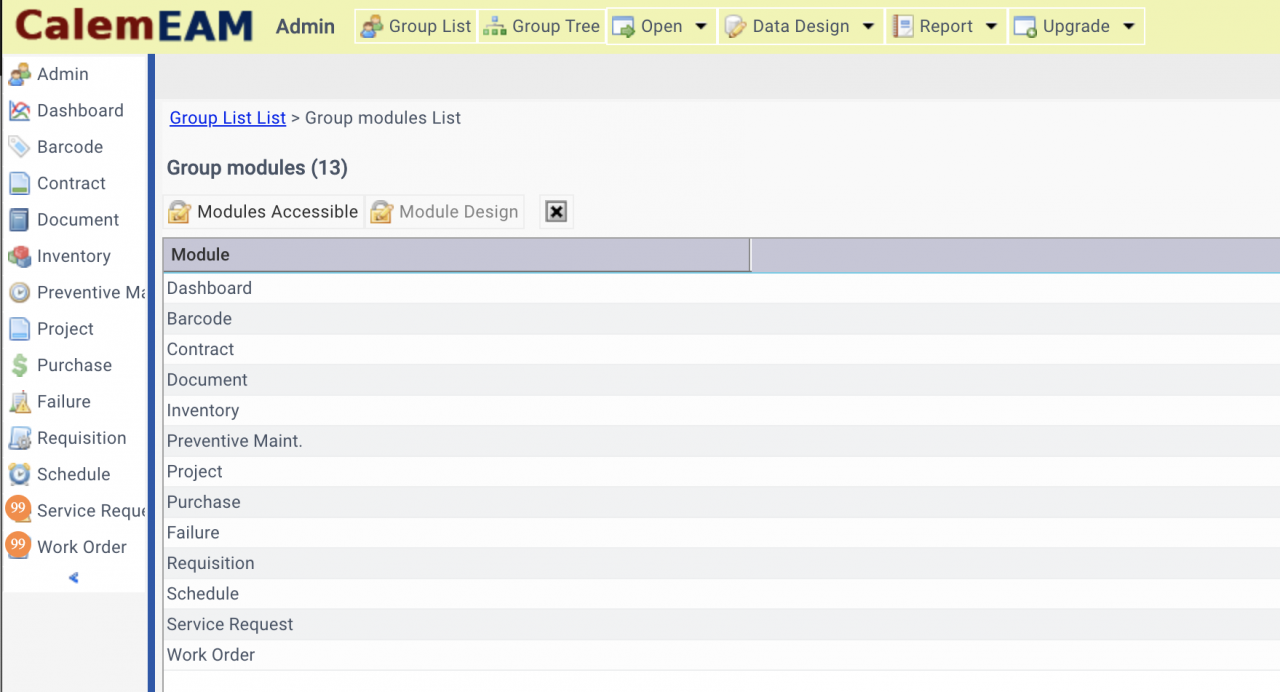
2. Modules Access Setup
Module Access Setup defines what modules are available to a group. Click "Module accessible" menu button in the "Group modules" list form above to launch module access setup screen below.
- The left panel shows modules that are not accessible to the group
- The right panel shows the modules granted to the group
- Drag a module from right panel and drop on "Module Design" of the left panel to remove a module for the group
- Drag a module from left and drop on "Module Design" of the right panel to add a module to the group.
- Order modules accessible in the right panel by drag-and-drop a module to another module. For instance, drag "Service Request" and drop on "Work Order" will move the "Service Request" module to show before "Work Order" module.
- When you are done, click "Save" in the left panel to save the modules accessible to the "Service-Tech" group.

3. Module Menu Access Setup
Module Menu Access Setup defines what menu items are available to a group.
- Click a module row in the group design list form to select a group. For instance "Work Order" module row is clicked.
- Menu "Module Design" is activated. Click this menu to set up menu items available for the group.
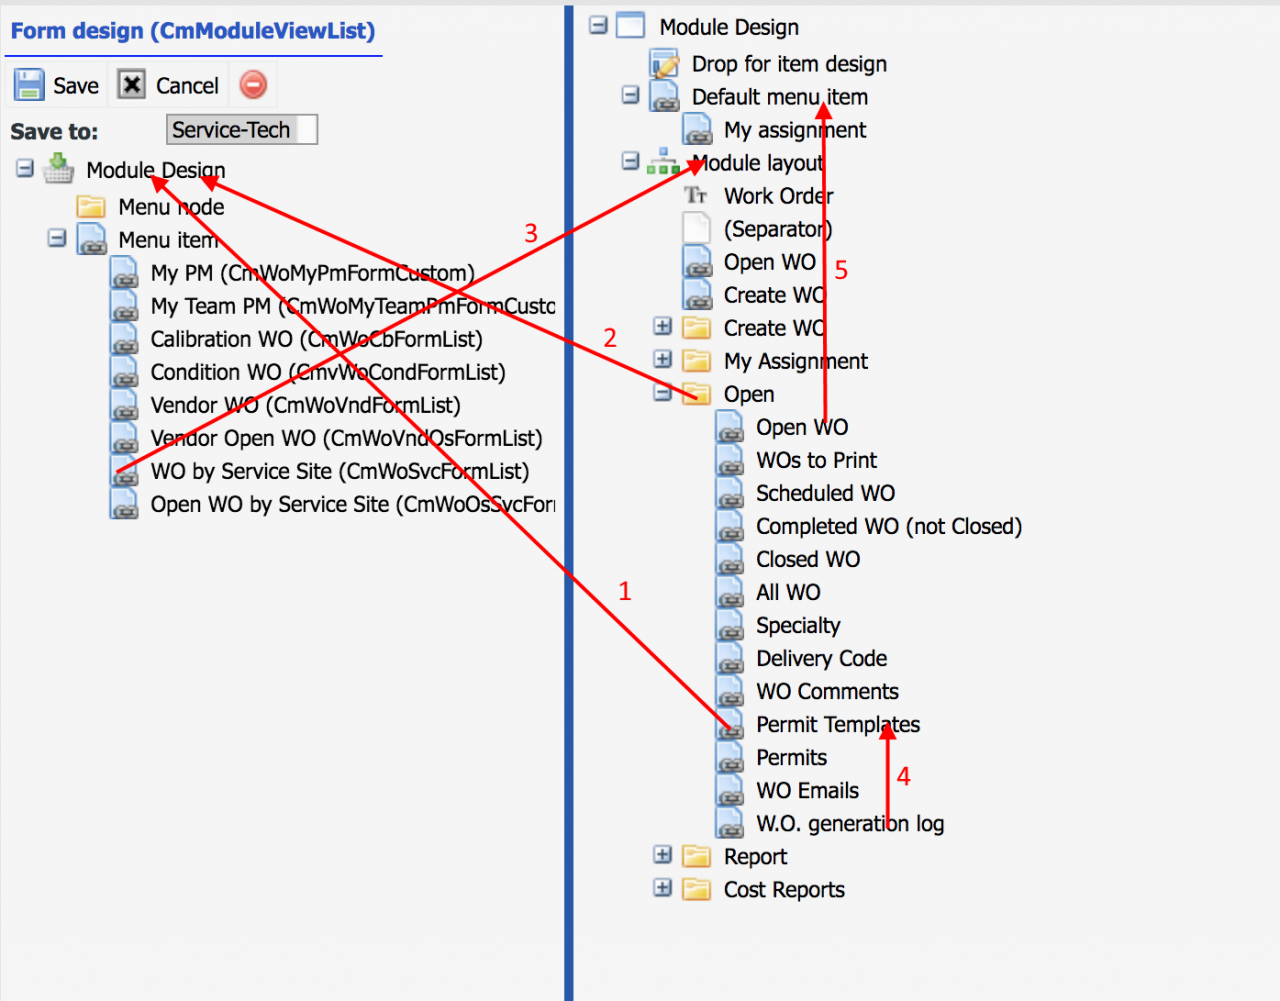
The "Module Design" menu button launches the module function design form below. You can tailor a module's function for the group:
- Remove a menu (1) or a menu folder (2) by drag a menu/folder in the right panel and drop on the "Module Design" node in the left panel.
- Add a menu (3) or a folder to the group by drag and dropping a menu/folder from the right panel and drop on "Module layout" in the right panel.
- Order a menu item (4) in the right panel by drag and drop it to another menu or a folder.
- Drag and drop a menu to "Default menu item" to make a menu item (5) the default menu to use when the module is clicked from the left module bar. For instance, drag and drop "Open WO" on the "Default menu item" will make "Open WO" form to open when work order module is clicked.
- Click "Save" in the left panel to save off the module function setup when you are done.
4. Group Design Report
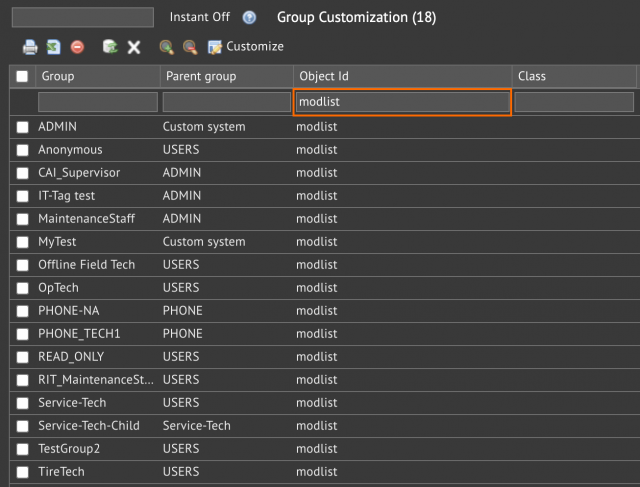
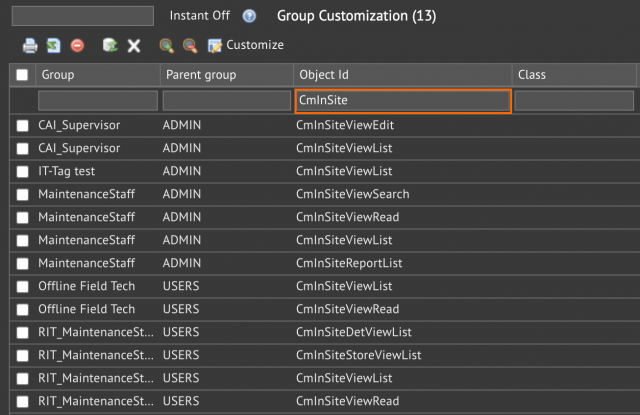
The report is available at Admin | Report | Group Customization. Use this report to find out what has been customized.
- For instance, which groups are customized for module access?
- Query the object for "modlist" to get all the groups.
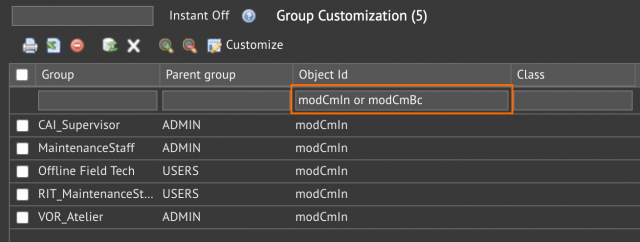
Another question may be what groups have inventory and barcode module customized. Query object for Inventory (modCmIn) or Barcode (modCmBc) to find out.
You can also query which groups customized Site Inventory forms and reports such as CmInSiteViewEdit, CmInSiteReportList, etc. Query object for "CmInSite" will show all the views/reports customized by groups.
5. Group Hierarchy and Access Control
Groups are hierarchical for efficient management of customization. Here is the process for Calem to find a customization of an object:
- If a group has a customization of an object, use it.
- Otherwise, go to the parent group of the current group, if a customization is found, use it.
- Otherwise, repeat the parent group search.

6. Access Control through Group Design
The steps to restrict access to an object are:
- Remove access to an object at the root group (Custom system) which removes the access to an object by default for all groups.
- For the groups to grant the access to an object, perform a group design to grant the access to an object. So, only designated groups have access to that object.
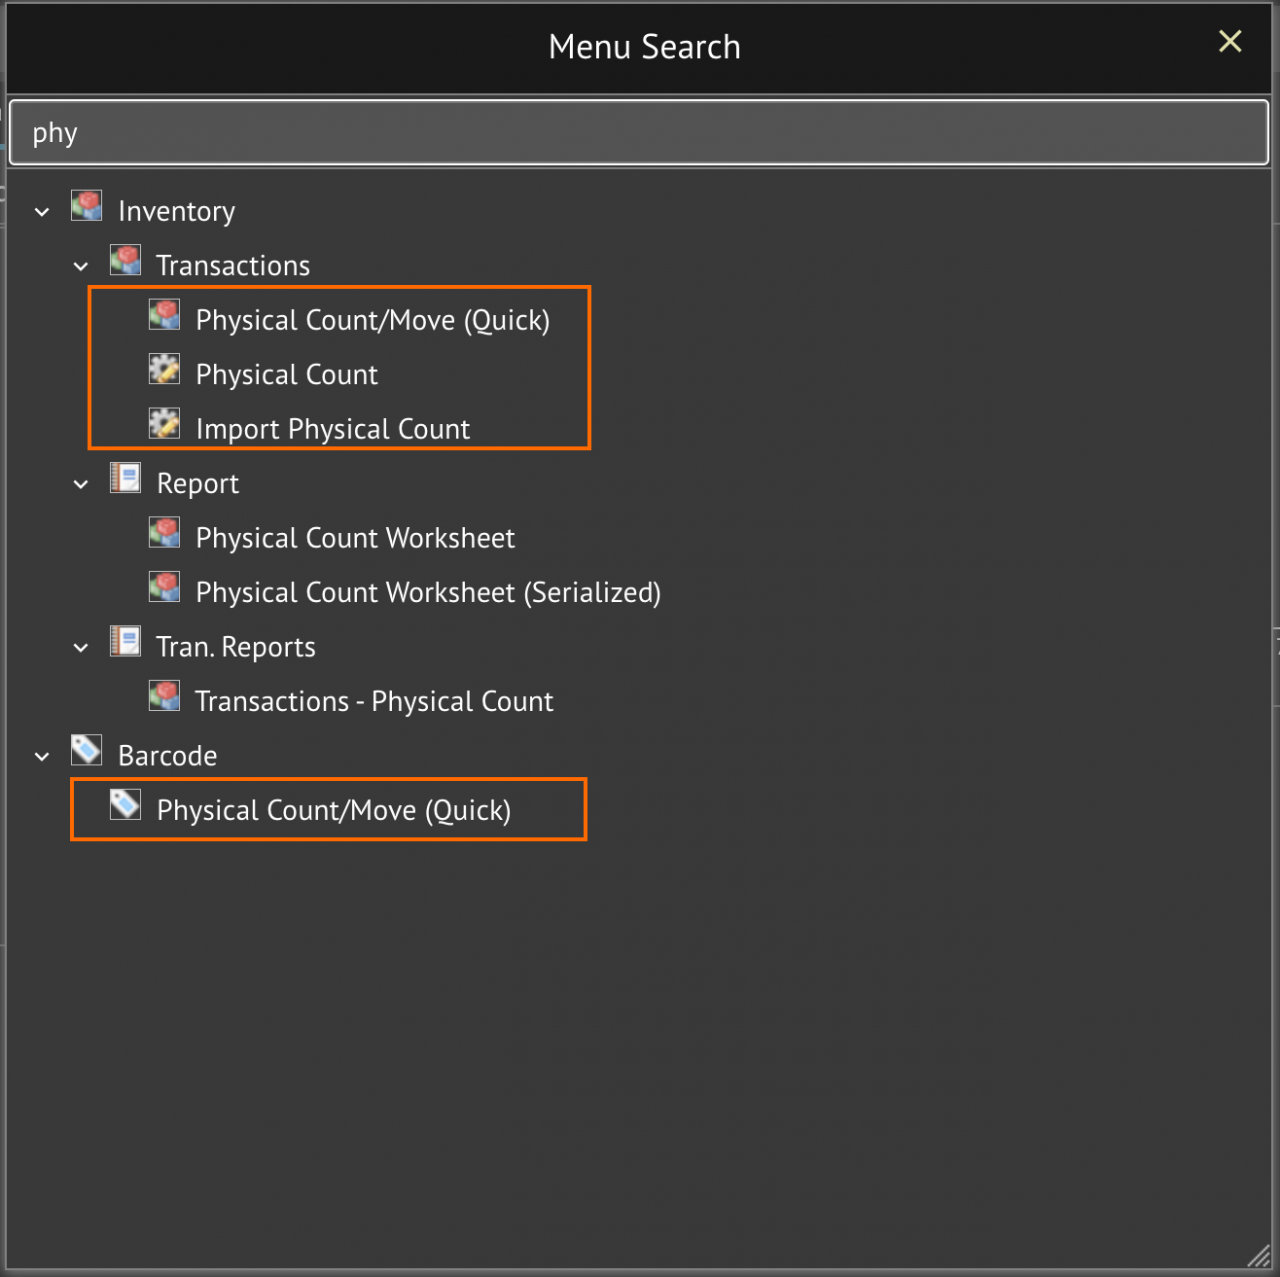
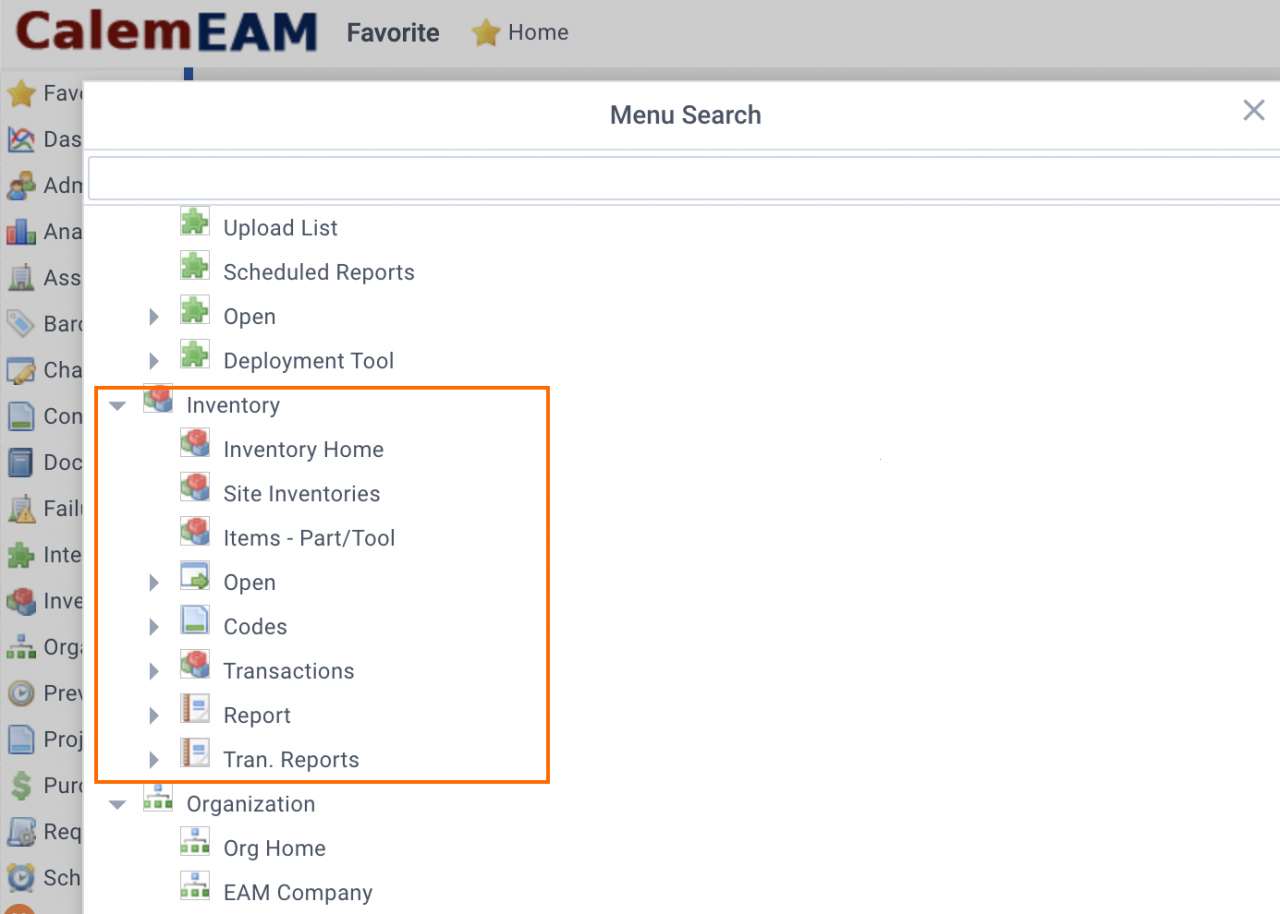
7. Example 1: Restrict Access to Physical Count Transaction
We will grant access to physical count transactions to "Service-Tech" and "Procuremenu" groups only (see the groups in the screenshot of group tree above). The menu for physical count transaction is highlighted in the menu search tree below. The steps are:
- Group design "Custom system" group
- Remove highlighted physical count menu from Inventory and Barcode modules respectively.
- Group design "Service-Tech" group. Add physical count menu to Inventory and Barcode modules.
- Group design "Procurement" group. Add physical count menu to Inventory and Barcode modules.
- Run Group Customization Report to query the groups with Inventory ("modCmIn") and Barcode ("modCmBc") module customization.
- Group design each group to review the module menu for Inventory and Barcode. Ensure that only "Service-Tech" and "Procurement" group has the menu for physical count transactions.
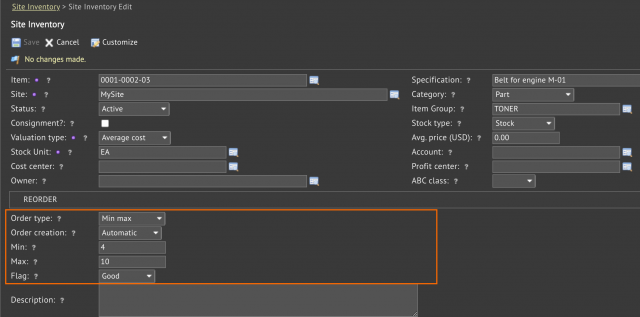
8. Example 2: Restrict Inventory Auto Re-Order Management
We will grant access to inventory auto re-order control to "Procurement" group only. The fields related to the auto re-order control are highlighted in the form below. The steps are:
- Group design "Custom system" group
- Go to Inventory | Site Inventory List, click an inventory row to open the inventory form.
- Edit the inventory, customize the edit form, drag and drop to remove the highlighted fields for re-order control from the edit form.
- Group design "Procurement" group
- Go to Inventory | Site Inventory List, click an inventory row to open the inventory form.
- Edit the inventory, customize the edit form, drag and drop to add the highlighted fields for re-order control to the edit form if applicable.
- Run Group Customization Report to query the groups with "CmInSiteViewEdit" customization.
- Group design each group to review the re-order control fields. Ensure that only "Procurement" group has the re-order control fields in the inventory edit form.
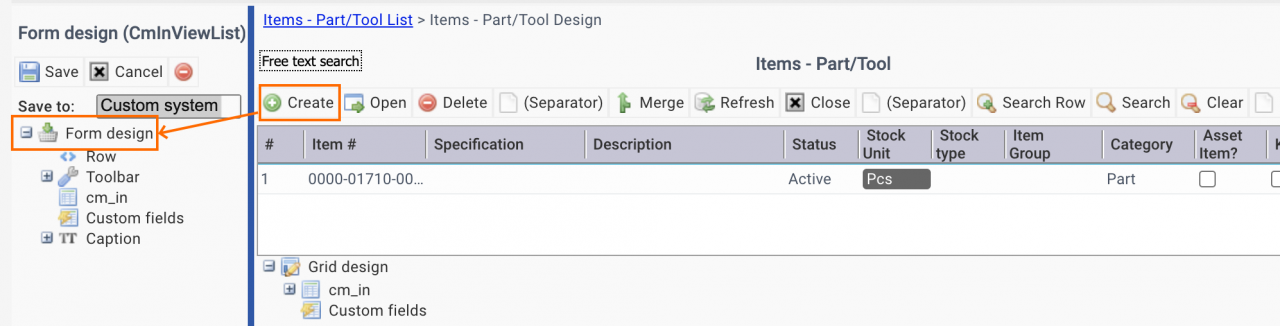
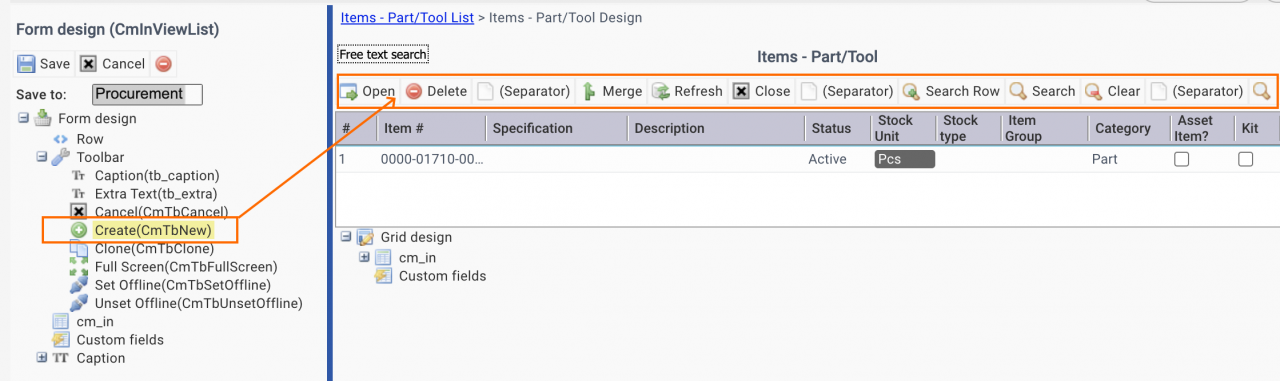
9. Example 3: Securing Items Creation
In this example, items are the part and service catalog for inventory management. Item creation is only allowed for "Procurement" group. This is implemented through group design and form customization. The first part is to remove item creation from "Custom System" group so it is not available for all groups inheriting from it.
- Group design "Custom system" group
- Customize "Items - Part/Tool" (at Inventory | Items - Part/Tool) and drag and drop "Create" off the form.
- The removal of "Create" from the form ensures no groups will have "Create" menu unless they overwrite the customization of the "Custom system" group.
Next, customize "Procurement" group to add "Create" button to the Items screen.
- Group design "Procurement" group
- Customize "Items - Part/Tool" and drag and drop "Create" to the menu bar of the form. The menu will show at the end of the menu bar. Drag and drop it to the first spot of the menu bar.
- Run Group Customization Report to query the groups with own "CmInViewList" customization.
- Group design each group to review the "Creation" menu. Ensure that only "Procurement" group has the "Create" menu in Items form.
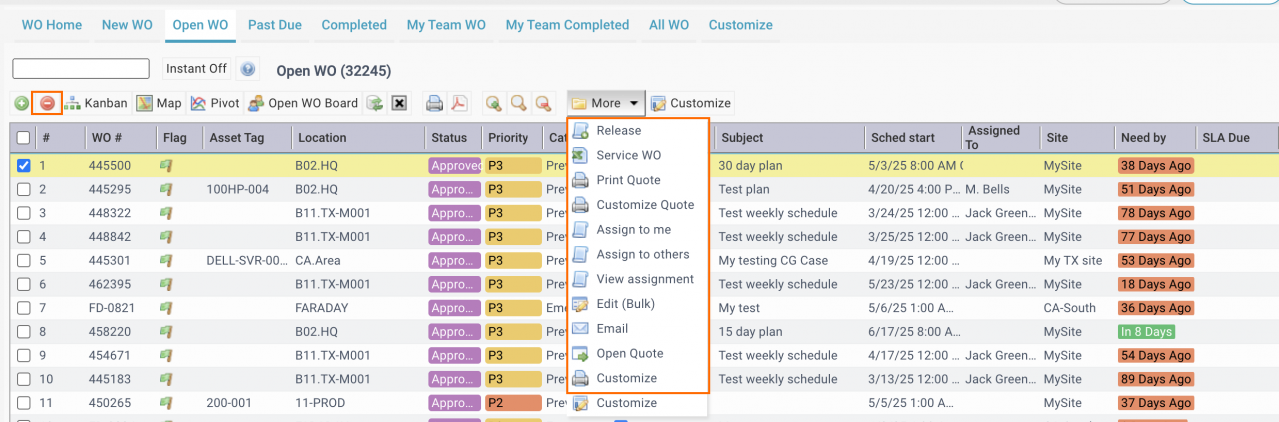
10. Example 4: Work Order Creation Only
In this example, work orders are customized to allow only creation. "Service-Tech" group will be picked for group design. "Open WO" is used as an example. You may apply the steps to other tabs.
The first step is to customize the menu to remove all dropdown menu after "More" (below). Click "Customize" to remove "Delete" and menu after "More" (next screenshot). This is done by drag and drop a menu from right panel to the "Form design" node in the left panel.

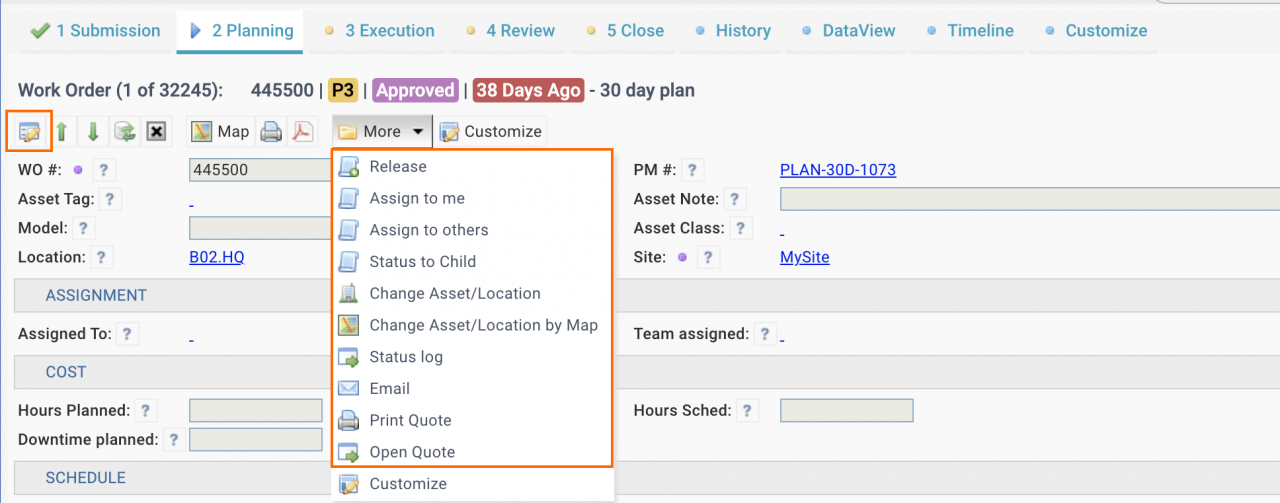
Next, click a row to launch a work order form. The ask view will show. For "Planning" tab, do the same menu customization (by "Customize" menu) as above, and remove "Edit' and all menu after "More". You may repeat the steps for other tabs (Submission, Execution, etc.) to complete the access control customization for work order main object.
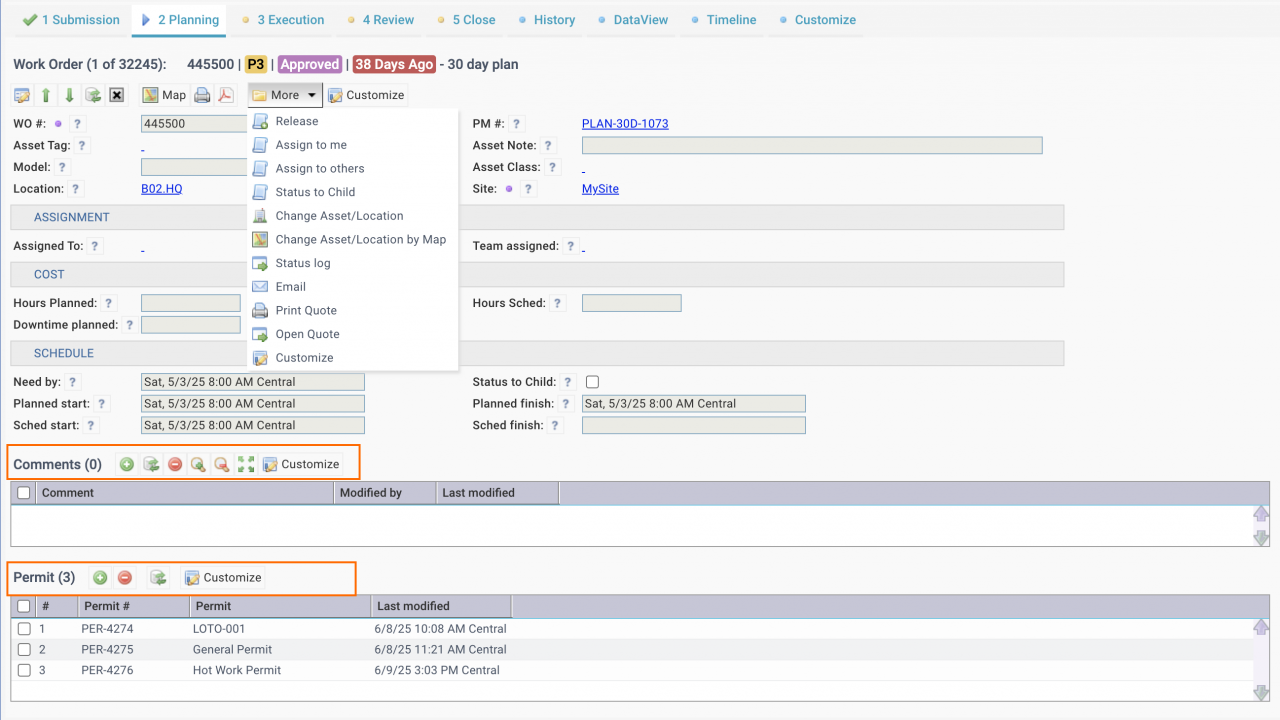
Next, you may apply the same customization to each detail list in the work order form. For example, "Comments" and "Permits" lists may be customized for menu removal.
11. Catalog of Module Permissions
A catalog of module permissions includes all the menu (forms and processes). Here are the steps to build out the catalog.
11.1 Admin Profiles
An admin profile has access to all the functions in Calem. A user needs to have an admin profile to build out the catalog.
- For desktop an admin profile is an ACL profile with "Custom system" group assigned as desktop group.
- For Mobile an admin profile is an ACL profile with "Phone" group assigned as Phone and Tablet groups.
11.2 Catalog Matrix
A matrix may be used to catalog the permissions for a module. Each row of the matrix may include a menu in a module, and its drill-down.
- Log into Calem with an Admin profile
- Click the desktop logo (Top-left icon) to display menu tree. See this blog.
- For instance, inventory module tree is shown in the screenshot below.
- One can browse all menu available for inventory in the tree.
- Add an entry to the matrix for each menu in the module menu tree.
- Click each menu to display the form or action associated with it
- If a menu is for a process such as inventory checkout, document the process in the matrix
- If a menu is a data view, document its menu and drill-down below.
- A list form shows a collection of records.
- A list form may include menu to create, delete, view a record, and other actions such as map view.
- Add menu for data actions in your matrix such as create and deletion.
- Click a row in a list may launch a record form or launch an action.
- See notes below to document record forms.
- A list form may include links in the list to jump to lookup record forms.
- Click a link to reveal its data views.
- A list form may include menu to create, delete, view a record, and other actions such as map view.
- A record form may include menu to edit a record, modify status, and other actions.
- Add menu for data actions to your matrix.
- A record form may display links to jump to other data forms.
- A record form may tabs. Each tab may include list forms showing data associated.
- Click an "Edit" button to launch edit form if available.
- An edit form display fields that are editable.
- Add critical fields to your matrix based on business requirements.
Additional resources
- How to Customize List|Report for Groups and Individuals
- How to Customize Access Control (ACL Profiles in Calem)
- How to Add Custom Fields and Customize Forms
- Finding a Menu in Calem Menu Tree
- Work Order Print Customization - see the steps to select a group for customization.
- User Guide and Admin Guide (customer account required)
- Calem Enterprise Training Site
- Calem Enterprise Blogs
- Calem Enterprise demo
About the author

By accepting you will be accessing a service provided by a third-party external to https://www.calemeam.com/